October 26, 2020
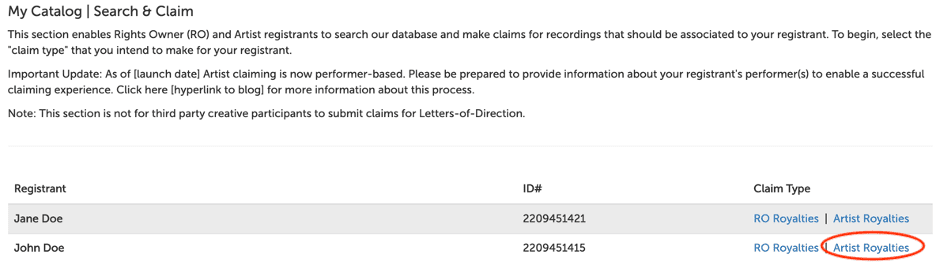
In November 2019, we released a host of new features to the My Catalog section of SoundExchange Direct (SXDirect), including “Search & Claim” (“S&C”). This feature provided sound recording owners (SROs) and artist registrants with the capability to search our database and make claims on recordings that should be associated to their accounts. Immediately, this feature proved to be immensely popular with our customers, with over one million recordings claimed to-date!
Until now, all your artist claims submitted via “S&C” were registrant-based and required manual processing by SoundExchange. While this certainly “gets the job done,” SoundExchange is always looking for ways to do more to help our customers get their recording claims into our systems with increased accuracy and efficiency. So, we’re happy to announce a significant upgrade to the “S&C” experience for our artist registrants: performer-based artist claiming.
About Performer-Based Artist Claiming
Moving forward, artist claims made using “S&C” will be performer-based. This means that when you claim a recording, you will have the capability to provide the shares for the performer(s) connected to your registrant. You’ll also be able to provide claims using varying percentages or different combinations of your registrant’s performer(s) within the same claiming session. This is a more precise way to make claims that accurately reflect the contribution to a recording made by your performer(s) and to ensure they receive their appropriate share for it. This granular claiming model will not only provide you with a better way to make claims, it will also enable us to process your claims much faster! Read on for a step-by-step guide on this updated functionality.
Step 1: Review Performer(s)
The first step of this process is to review the performer(s) that is currently associated to your registrant account. The performer(s) listed here will be the performer(s) made available to you in future steps when you construct your claims. If everything is accurate, then you’ll proceed to the next step.
If you notice a performer is missing or a performer who should not be associated to your registrant, you can add or remove performer(s) during this step. Any added performer(s) will be available in later steps to use when claiming. For a more detailed explanation of adding and removing performers, please see our blog post, “My Catalog Update: Membership Summary.”
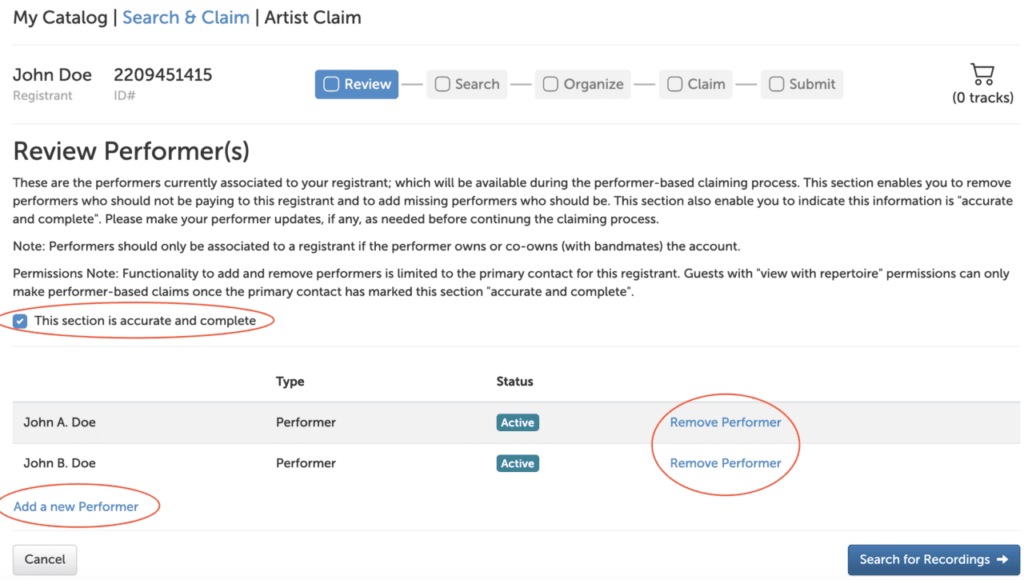
Permissions note: The primary contact on-file who administers the registrant’s account is the only contact who is authorized to add or remove performers or make artist claims on their behalf. If the primary contact has checked the “accurate and complete” check box, this will enable account guests with repertoire permissions to also use this claiming tool on the registrant’s behalf.
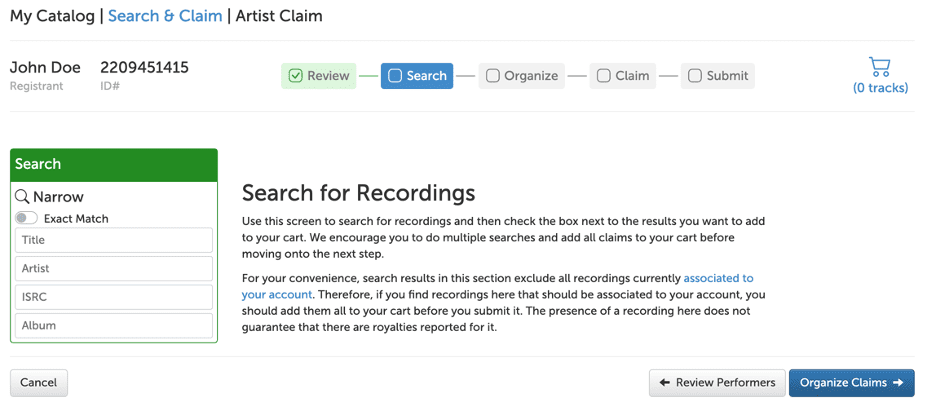
Step 2: Search for Recordings
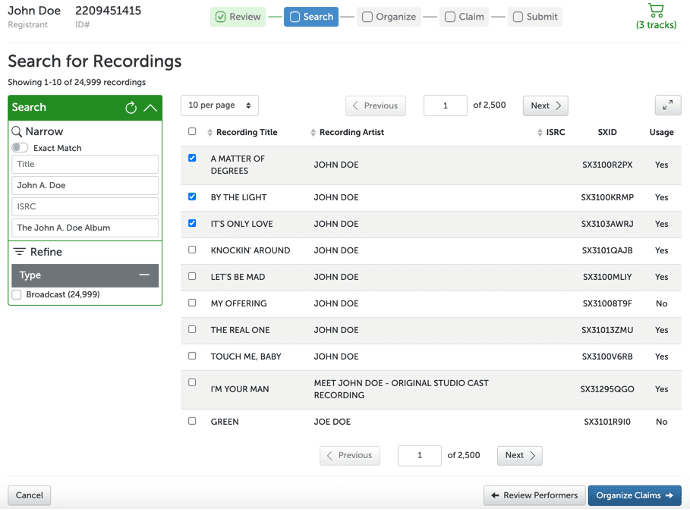
This next step is where you’ll search for recordings within our database and add the ones you want to your cart. It’s important to do a thorough search and add all the recordings you intend to claim to your cart before moving on to the next step. Please note, for your convenience, these search results exclude all recordings that are currently associated to your account. Therefore, if you find any recordings in the search that should be associated to your account, you should add them all to your cart before continuing.
This is how search results will populate on the page. Click the check box next to each recording you’d like to add to your cart.
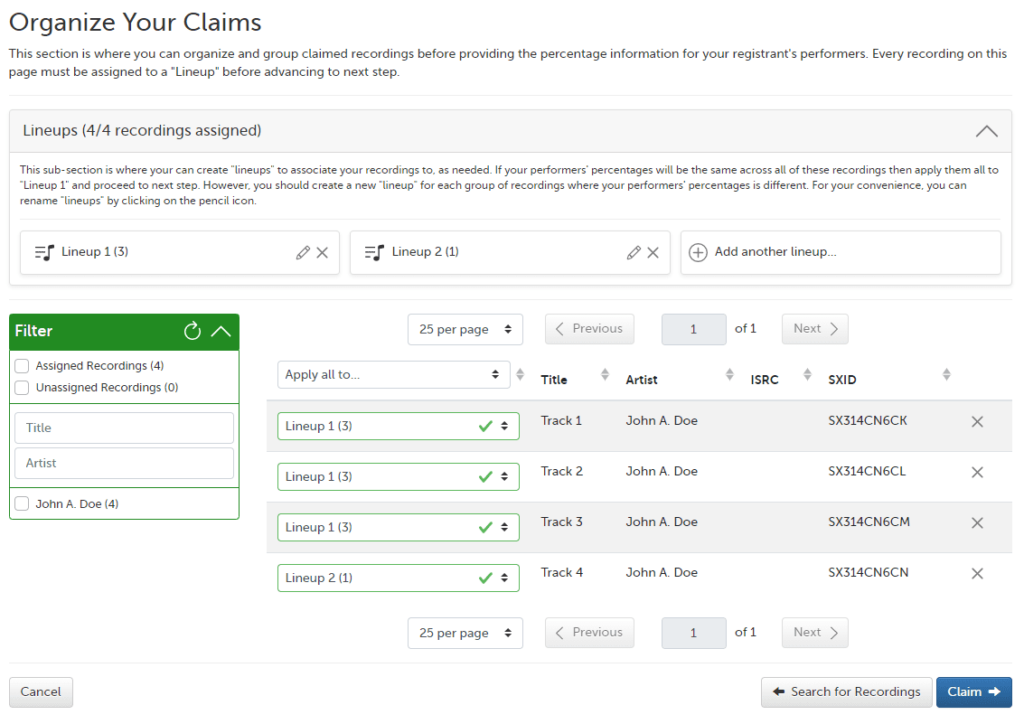
Step 3: Organize Your Claims
After adding recordings to your cart, the next step is to organize your claimed recordings into groups (aka, lineups). You should make a new lineup recording group any time your performer share information will be different, or the combination of your performers on the recordings will change. For your convenience, you can rename lineups to help organize your claims.
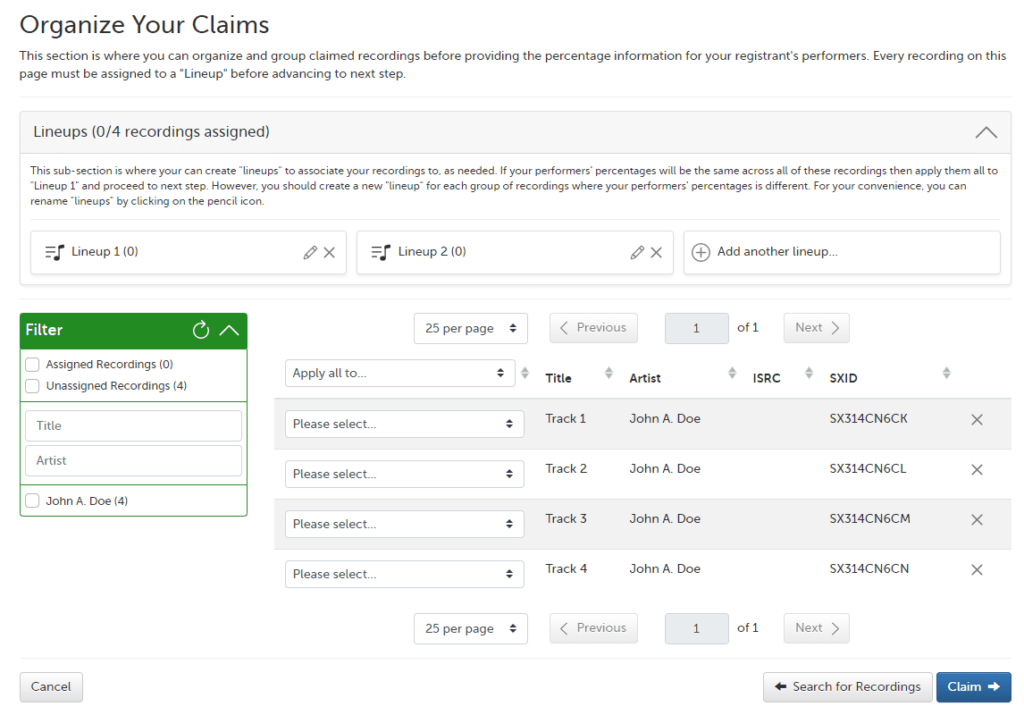
Use the dropdown menu next to the song title to apply each recording to a lineup. If your performers’ percentages are the same for all the recordings in your cart, you can simply apply them all to “Lineup 1” and proceed to the next step. However, you should create a new lineup for each group of recordings where your performers’ percentages are different.
For example:
- Registrant A has two performers and plans to claim four recordings, but the performer shares are different from recording to recording. In this example, three recordings are a 50/50 percentage spilt and one recording is a 75/25 percentage split.
- Assign the three 50/50 recordings to Lineup #1
- Add Lineup #2
- Assign the one 75/25 recordings to Lineup #2
Please note, every recording on this page must be assigned to a lineup before moving on to the next step.
Step 4: Make Your Claims
Here, you’ll provide the individual performer share information for each lineup you created. The performer shares provided here should reflect the individual performer’s contribution to the recordings in that lineup. The shares you provided will add up to the “total payment percentage” (TPP) that your registrant will be paid for those recordings.
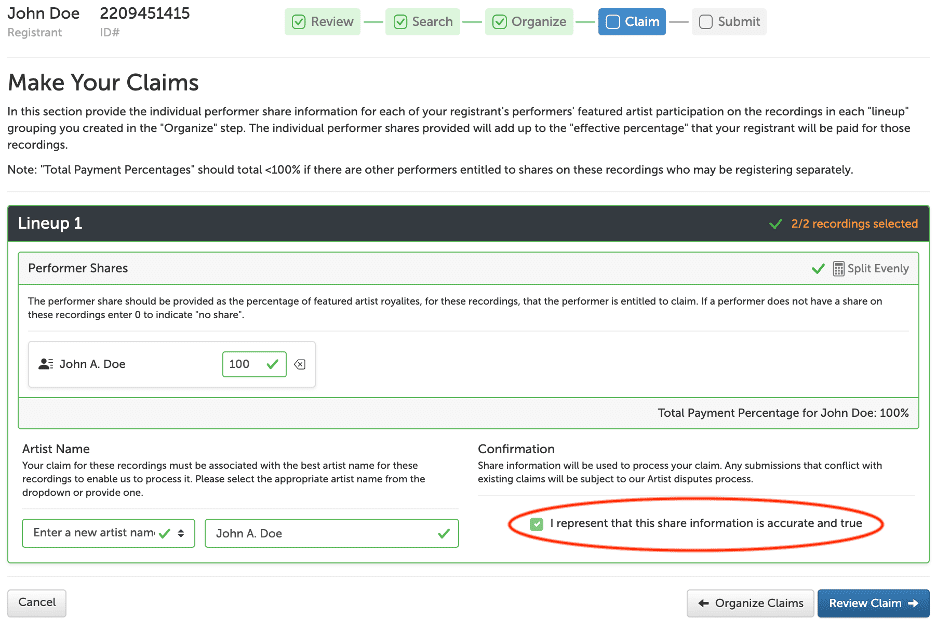
Note: Your registrant’s TPP should be less than 100 percent if there are other performers, who may be registering separately, entitled to shares on these recordings. If your TPP is 100 percent on these recordings, then when the other performers register and make their claims, it will trigger an artist dispute. However, if you leave room for their shares, then it will likely not trigger an artist dispute case.
The “Artist Name” field is an additional piece of information we require so that we can process your claims faster. Please select or provide the best artist name for the recordings in each lineup. You can select the appropriate artist name from the dropdown menu (populated with artist names already associated with your performer) or provide a new one that is a more appropriate match to the recordings. Once you’ve reviewed and checked off that all your lineups and shares are accurate and true, you’ll move on to the final step.
Step 5: Submit
This is where you’ll do a final review of your claim information for accuracy before submitting. If you need to change a detail, you can navigate back to the appropriate step to make your correction. Otherwise, you can click “Submit Claims” then review and acknowledge the legal agreement as a final confirmation that your claims are accurate and true. Note: once you’ve completed this step, you will not be able to edit your claims.

Once you’ve submitted your claims, you will be taken back to the beginning of the claiming process. You can see a record of the claims you’ve just submitted by selecting “Upload History” under the “My Catalog” dropdown menu. Once we have processed your claim, you should see the recordings you claimed in your “Associated Recordings” section.
These additional steps in the artist claiming process enables us to quickly verify the information, identify the recordings in our system, and associate them to your account—all of which gets your registrant paid faster!
If you have any further questions, please contact our Customer Care team at 1-800-961-2091 or via “Contact Us” in SXDirect.